

If you are new to pop-up camping, buying a used camper to save money can seem a bit intimidating. There are a wide range of things to consider. But, it isn’t nearly as confusing as it may seem.
You do want to know what sorts of things to look out for to know what you are getting into and also to leverage the best deal possible.
Problems or repairs can generally be categorized as simple ($15-$75), intermediate ($75-$200), or major ($200-$3,000). With that in mind, it makes negotiating a suitable price manageable if you know what to look for.
Some simple repairs would include:
- Small tears in canvas, vinyl, or tent screens
- Battery replacement (assuming you’re fine with a standard lead acid deep cycle battery)
- Veneer that has worn or chipped from age or abrasion
- Shower heads or other plastic fixtures
- Re-upholstery
- The following items as long as there is no evidence of water damage
- Small exterior punctures, dings or dents
- Minor roof punctures or dings
- Seals that needing re-sealing
Some intermediate repairs would include:
- Worn tires
- Rusted or broken lift cable (usually exposed near the winch)
- Heaters
Some major repairs would include:
- Roof problems (roof sag, holes, water damage)
- Water leaks
- Floor rot
- Busted plumbing due to poor winterization
- Moldy or severely worn canvas
- Propane line damage
- Appliances needing replacement
- Broken AC units
- Malfunctioning motorized winch
The funny thing about simple or intermediate repairs is that they can still save you a few hundred dollars on the price. You might be surprised how many of the people don’t know how easy these repairs can be.
So, with that background knowledge, here are 7 things to look for when buying your first pop-up camper.
1. Look for a camper that fits your defined wants and needs.
First and foremost, make a list of the things that are important to you.
- Low cost?
- Bunk size?
- How many does it sleep?
- Lightweight to tow behind a V6?
- High ground clearance?
- Shower and potty?
- Updated styling?
Only after you make that list should you begin shopping campers. Once you begin exploring used pop-ups on the market, it is easy to get caught up in the chase rather than remaining disciplined to your budget and needs.
2. Know how much you can safely tow.
Once you know what you want, you need to understand the limits of what you can safely tow. I have encountered many sellers of 3,000-pound pop-ups who say, “Yeah, you can tow this. I pull it with my minivan.”
It is important to know the limitations of your tow vehicle. If you plan to tow your pop-up with a small SUV or other V6, you need to pay close attention to your car manual. It will dictate how much weight your car can safely tow.
If you don’t feel like running to get your manual right now, you should know that a general rule of thumb is:
- 1,500 pounds for a front wheel drive car or small SUV
- 3,000 pounds for a mid-size all-wheel drive SUV or pickup
- 5,000 pounds or more for a full-size SUV or half-ton pickup
Bear in mind that when you evaluate weight, you need to account for the weight of the passengers in your car as well as any cargo you plan to haul. Coolers, propane, clothes, chairs, etc., accumulate weight quickly.
While the “Camper Fails” video below is mostly full-size campers, it still serves as a stark reminder why you want to make sure you can safely drive your camper, and that your camper doesn’t drive you.
3. Research your camper on NADA guides.
Just like you would search for vehicles on Blue Book, you can search for camper values with NADA. Look up the model, year, and even features, to get a realistic price for what the camper should cost. Use the average price as a starting point for your negotiations.
(I recommend using the average price, because starting from the low end may alienate the seller and result in them selling it out from under you.)
4. Watch out for a saggy or water-damaged roof.
Two of the costliest repairs are repairing a roof and repairing a canvas.
There are some roof-related things you can see from the inside of the camper. Look for discoloration on the ceiling. Don’t be hesitant to feel the ceiling with your hand to check for soft spots or places where the ceiling material has separated. Those could be signs of roof or water damage, and you don’t want to endure roof damage on a rain spring break trip. You should also move curtains during this process to make sure you don’t miss hidden areas.
If things look good on the inside, you will still want to see the roof when the camper is down. That is the best way to check for dings or holes in the roof. Always take time to inspect the roof when the seller pops down the camper.
If the used camper you are looking at is a Coleman from the mid-90s to early 2000s, you will want to pay special attention for something known as roof sag. In the late 1990s, Coleman manufactured seamless, 1-piece ABS roofs. Note the smooth, single moulded roof in the picture below.
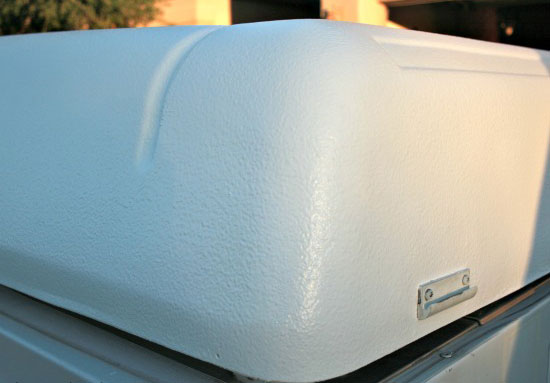
It seemed great at the time. But, it didn’t turn out like the company hoped. A significant number of campers began to experience cracks and roof sag. This phenomenon was more pronounced with 12-foot camper boxes than with 10-foot boxes; with campers having air conditioning units; with campers owned in warmer climates; and with campers where the roofs themselves were manufactured in warmer climates.
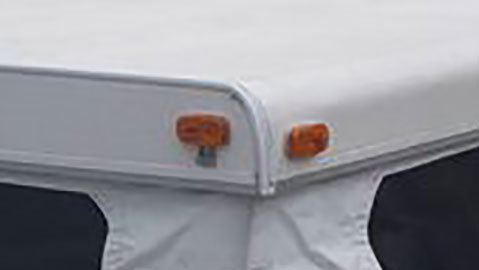
Other brands normally had seams in their roof construction like the example below. For those, you will mostly want to check that there isn’t any separation that caused leaks or water damage.
Three of the top signs are soft spots, discoloration, or separation of the metal from the underlayment, which you can feel with your fingers when you press down on the roof.
5. Watch out for soft spots in the floor.
Soft floors can be another sign of water damage. Be sure to walk the full length of the inside of the camper. Be intentional to feel with your feet. If it feels solid in some areas, but soft or springy in others, it could be a sign of trouble.
6. Inspect the lift cable.
There are a couple of common types of lift systems.
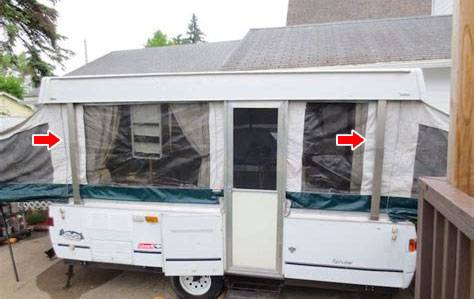
The first, which is common in many older campers, involves 5 cables. A main cable connects to a central hub, which connects to more cables that route to pulleys in the four corners of the camper to lift the roof. This type of lift system can be a bit more complicated to repair. Depending on the camper model and year, the eye bolts that hold the corner cables may be in obscure places in the camper.

You can tell whether a pop-up has this style of lift system when the camper is up. Simply look inside the lift posts (identified with the red arrows below) when the camper is up. If you see cables, it has the older style of lift system.
The second style, the Goshen lift system (named after the manufacturer), uses a single main lift cable under the camper, which pushes springs into the four corners to lift the roof.
These are very easy to repair. The job is a bit messy because of the grease, but it takes less than an hour and under $100 in parts to replace the main lift cable. If you choose to take it to a camper service center, expect to pay $100 in parts plus $100-$130 per hour for service. The repair shouldn’t take more than an hour.
Issues with the lift system are one of the best ways to negotiate a deal on a used pop-up. Look at the front of the camper near the winch. You may see exposed cable coming from beneath the camper. The cable in that spot is commonly rusted, or perhaps you will see a strand of the cable that has frayed. For either of these, you will most certainly have to replace the cable at some point. The last thing you want is for the cable to break while you are on a trip.
Ask for a couple hundred dollars off the camper price to cover the parts and service. Then, if you are remotely handy, make the repair yourself.
7. Inspect the tires.
When a seller tells you that the tires are less than a year old, it is useless information. For one owner, the tires may have traveled 500 miles. For another, they may have traveled 5,000 miles.
Also, tires that sit stagnant in someone’s back yard, where they are exposed to sun, begin to dry out, crack, and rot.
Always take the time to get down on your knees and look at the tires. In particular, look at the tread toward the inside of the camper tires. If the tread is shallow or cracked, you can use this in the negotiation.
Pop-up camper tires usually range $50-$80 each. Our local tire shop makes the swap and balances the tires for about $12 each. Don’t be afraid to ask for $200-$300 off because of the inevitable replacement.
8. Demo the propane, water lines, and AC unit.
I recommend buying a pop-up when the weather is moderate. In winter, it is easy for a seller to tell you that they can’t show you the water because the camper is winterized. Similarly, in winter, it will be harder to tell whether the AC works, or whether you’re simply feeling the fan running.
As for propane, it is easy enough for the seller to light the furnace, stove, or water heater to show you that the propane works well. Be sure to check it at the inside stove, outdoor stove, heater and water heater if the camper has them.
Of course, if the seller has the camper in a stored space, you may be able to evaluate these things even during the winter months.
9. Check the title with the DMV.
Just like with cars, you can check the title with the DMV.
If a camper is on your short list, take 15 minutes to pay for the lookup on the DMV website. The cost is about $25, and it may turn up risky items like existing liens on the camper, or other lurid details of its past.
Conclusion
I hope these tips help you feel more confident in purchasing your first pop-up camper. As they said in G.I. Joe, “Knowing is half the battle.”

[…] a previous post about buying used pop-ups, I talked about how to get a great deal on a used pop-up campers. In short, it helps to know a bit […]
LikeLike